Monday, April 30, 2012

Blueberry Cake with Coconut Cream Cheese Frosting

Blueberry cake with coconut cream cheese frosting
 This recipe was a way to use up coconut and blueberries.  We have these beautiful frozen blueberries in our freezer and will need to eat them up before its time to pick new ones mid-summer.  They stay fresh in the freezer for up to a year (or longer) by the way.  The best part about this recipe is, it looks so beautiful, tastes fresh, moist, and sweet, and is so easy to make!  This cake was the following recipe:


Ingredients:
For the cake you'll need:
1 box of french vanilla cake mix
3 eggs
1 tsp of vanilla
1 tsp of coconut extract (you can skip this if you don't have it on hand)
1/3 cup oil
1 1/4 cups coconut milk (you can use regular milk to substitute)
2 cups fresh or frozen blueberries, combined with a dusting of flour


Prior to baking
For the frosting:
1/2 stick butter, room temp
1 8oz package cream cheese, room temp
1/4 tsp coconut extract
1/2 tsp vanilla extract
4 cups confectioners sugar
2 cups sweetened shredded coconut (this is optional-for sprinkling on the top and sides- its great because it disguises a slightly messy frosting job!)  

Optional:
The batter rises up around the blueberries
Between middle and top layers, spread 1/2 cup of blueberry preserves.  Microwave slightly so that it thins enough to spread.  I tried this and it turned out great.  

Directions:
Preheat oven to 350 degrees.  Grease and flour 3 round cake pans or pie pans.  Prepare cake by combining cake mix, eggs, vanilla and coconut extract, oil, and coconut milk in a mixer.  Combine according to cake package directions. Pour cake mix equally into 3 round pans.  You can try this with fewer layers and or even in a sheet cake and it would still taste great.  You would end up with a little extra frosting if you had less layers, though.  After pouring the cake batter, sprinkle the floured blueberries directly on top of the batter.  Don't press in, the cake will rise up and around the blueberries.  Place in oven and bake about 20 minutes, or until toothpick inserted in center comes out clean and the cake is golden on top.  Allow cake to cool for 10 minutes or so.  Meanwhile, assemble the frosting: cream butter and cream cheese until smooth.  Add in vanilla and coconut extract.  Slowly add confectioners sugar 1/2 cup at a time until the frosting is creamy and smooth.  Frost the cake by putting a layer of frosting between each cake, plus more for the sides and top.  When finished, sprinkle coconut over the top and sides.  Helpful hint: You can hold your hand upright next to the cake to block the coconut from falling away from the sides of the cake and to force it to stick to the sides.  Its tricky, but if any falls on the cake plate you can scoop it up and sprinkle it on the top, no big deal.  
 Allow to chill in the fridge, its delicious served cold with a nice tall glass of milk.


Saturday, April 28, 2012

Before and After- Yard Sale Find


I found this barn wood picture frame at a yard sale for fifty cents.  I loved the frame and got it without really thinking a lot about what to put into it- some kind of custom size painting that I have yet to do perhaps?  But after we got home, Ben had an idea of what to do with it.  We've recently started using a printer that does great photo prints, without using expensive ink.  We figured out that it comes to about eleven cents per full page of ink.  Not bad!  Ben figured out how to print a panorama photo we shot in West Virginia on vacation last summer to fit the strange 20X5" size.  It does have a seam in the middle, but its hard to notice and we love it.  Project total?  61cents (50 cents for the frame and 11 cents for the photo).

Wednesday, April 25, 2012

African Sweet Potato and Peanut Stew

This stew recipe is from  this  book we got for free at a yard sale this weekend.  Its so delicious!  We were going to freeze the extra (it makes enough for 6-10 servings) but we ate the leftovers so fast we didn't need to.  Ingredients:
3 tbsp water
2 medium yellow onions
3 garlic cloves
2 red bell peppers, cut in 1 inch squares
1 tbsp light brown sugar
1 tsp grated or minced fresh ginger (we used 1/4 tsp ground ginger)
1 tsp ground cumin
1 tsp ground cinnamon
1/2 tsp cayenne pepper
1/2 to 3/4 cup smooth or crunchy peanut butter
3 sweet potatoes, peeled and cut into small cubes
1 can red kidney beans, drained (we used pink beans)
1 can diced tomatoes
4 cups vegetable stock
1 tsp salt (or to taste)

Directions:
Heat water in a large sauce pan- add onions and garlic and cook until softened.  Add bell pepper, cover, and cook until softened.  Stir in brown sugar, ginger, cumin, cinnamon, and cayenne pepper, and cook, stirring, for 30 seconds.
Stir in peanut butter, distributing evenly.  (We tried thinning the peanut butter out first with a whisk and water before adding to the pot, so that it incorporated evenly into the stew).
Add sweet potatoes, beans, and tomatoes.  Add vegetable stock, bring to a boil, then simmer on low until sweet potatoes are soft (about thirty minutes).  Taste and salt if necessary. 


Sprouted lentils with Broccoli

If you take lentils, soak them overnight, then rinse twice daily for 1-2 days, they begin to sprout.  Basically, it mellows the flavor out and they get sweeter and more delicate.  The texture changes to slightly crunchy and crisp, with an almost sugar snap pea flavor.  Its amazing.  I tried it for the first time lately and was surprised at how it turned lentils from being boring and brown to tasting fresh and almost like fresh peas from the garden.  Try it sometime!  You can eat them raw as a healthy, crunch snack (just 82 calories per cup with 6 grams of protein!) or saute them with veggies like we did.   It doesn't take much work and its kind of fun to see them "starting to grow."  We can't really garden much since we have a balcony but this is one way to "grow" something indoors. 

Sunday, April 22, 2012

Vegetarian "chicken" sandwich healthy alternative


I used to like chicken patties and would eat them at the school cafeteria, or in a fast food meal. But one day I bit into one- and crunched down on a small piece of...something.  Fat? Ligament?  I don't want to know.  Shudder.... its just a big yuck factor for me eating processed meat.  Before trying vegetarian alternatives, I didn't know something could taste similar, but you would be surprised.  The more processed the meat (think sausage or chicken patty) the more similar the vegetarian alternatives taste.  It makes sense, I guess, since most processed meat is pretty spongy and gets a lot of its flavors from additives.  The vegetarian alternatives aren't something that is such a "super healthy" alternative that you'd want to eat them every day- definitely not.  They are still highly processed, and can be expensive as well.  Still, though, they are definitely a healthier alternative to the meat versions- less fat and cholesterol, as well as boasting a similar protein content.  For a healthy alternative to a fast food chicken sandwich, I toasted a Morningstar Farm vegetarian chicken patty with a half a slice of Texas Longhorn Cheddar cheese and some ketchup, on a honey wheat sandwich thins.  It tasted very similar to the famous chic-fil-a sandwich, but much less fat and sodium.  Yummy!   In case  you were wondering what was next to the sandwich on the plate- its matzoh crackers spread with cream cheese and topped with horseradish topping (dug up from my in-laws garden.)  Sounds a little strange but my husband was very hungry while I was making dinner and thought he would make a little snack to munch on in the mean time :).

Blueberry cinnamon rolls with lemon-cream cheese icing


Adapted from this recipe from carnal creations blog.  I followed the recipe, except for changing the lemon glaze to a homemade cream cheese icing with fresh lemon juice and zest whipped into it.  But next time I'd love to try the lemon glaze, because it sounds really good too. Very refreshing and the perfect compliment to the sweet blueberries.  We took the extra cinnamon rolls and froze them individually to enjoy them over the next several weeks, but if you have a big family they may be gone in one sitting!
Ingredients
    For the dough:
  • ¾ cup whole milk, heated to 110 degrees
  • 1 envelope (2¼ teaspoons) instant or rapid-rise yeast
  • 3 large eggs, room temperature
  • 1 teaspoon vanilla extract (optional)
  • 4¼ cups all-purpose flour
  • ½ cup cornstarch
  • ½ cup granulated sugar
  • 1½ teaspoons salt
  • 12 tablespoons (1½ sticks) unsalted butter, cut into 12 pieces and softened
  • For the filling:
  • ¾ cups packed light brown sugar (don't use dark, it will be too heavy a molasses flavor)
  • 2½ teaspoons ground cinnamon
  • ⅛ teaspoon salt
  • 1 pint fresh blueberries
  • 1½ teaspoons fresh lemon zest (from one lemon)
  • 5 tablespoons unsalted butter, softened
  •  
    Icing
  • 2 tablespoons freshly squeezed lemon juice (from one lemon)
  • 1 teaspoon lemon zest
  • 2 tbsp unsalted butter, softened
  • 6 oz cream cheese, softened
  • 1 teaspoon vanilla extract
  • 3 cups confectioners' sugar
Instructions
1. To prep:
Adjust oven rack to middle position and heat oven to 200 degrees. When oven reaches 200 degrees, shut off. Line the bottom of a 13- by 9-inch baking pan with foil or parchment paper. Grease foil or parchment paper and sides of the pan. You can also use a round 9" cake pan like I did, but you'll need at least two of those if you go that route. Also, grease a medium bowl to hold the dough when it's completed.
2. For the dough:
Whisk heated 110 degree milk and yeast in liquid measuring cup until yeast dissolves, then whisk in eggs and vanilla extract. In bowl of stand mixer fitted with dough hook, mix flour, cornstarch, sugar, and salt until combined. With mixer on low, add warm milk mixture in steady stream and mix until dough comes together, about 1 minute. Increase speed to medium and add butter, one piece at a time, until incorporated. I added my butter in 4 second intervals. Continue to mix until dough is smooth and comes away from sides of bowl, about 10 minutes. if after mixing for 10 minutes the dough is still too wet and sticky, add up to ¼ cup flour (one tablespoon at a time) until the dough releases from the bowl. Turn dough out onto clean surface and knead to form a smooth, round ball. Transfer dough to prepared bowl, cover with plastic wrap, and place in warm turned off oven. Let rise until doubled in size, about 2 hours. I usually turn my 200 degree oven off as soon as I put the dough in to rise to jumpstart the yeast.
3. For the filling:
Combine brown sugar, cinnamon, and salt in small bowl using a fork or your fingers to break up any large lumps. Turn dough out onto very lightly floured surface (I never sprinkle flour down before rolling because there's so much butter in this dough it never sticks, but everyone's work surface is different). Roll dough into 16-inch square, spread with 5 tbsp of softened butter, and sprinkle evenly with filling. Lightly press the filling into the dough. Evenly sprinkle the blueberries and lemon zest over the filling. Starting with the edge nearest you, roll dough into tight cylinder, pinch lightly to seal seam, and cut into 8 pieces using either a serrated knife or bench scraper. It's easier to cut the dough in half, then cut each side in half until you have 8 large rolls. For smaller cinnamon buns, cut the dough into 12 pieces. Transfer pieces, cut-side up, to prepared pan. Cover with plastic wrap and let rise in warm spot until doubled in size, about 1 hour.
4. For the icing and to bake:
Heat oven to 350 degrees. Whisk softened butter, lemon juice, lemon zest, vanilla, cream cheese, and confectioners’ sugar in medium bowl until smooth. TDiscard plastic wrap and bake buns until deep golden brown and filling is melted, about 25 to 35 minutes. Cool for about 15 minutes then ice rolls before serving warm.
*Make Ahead: After transferring pieces to prepared pan in step 3, buns can be covered with plastic wrap and refrigerated for 24 hours. When ready to bake, let sit at room temperature for 1 hour. Remove plastic wrap and continue with step 4 as directed.
*Reheat any leftover rolls in the microwave for 10 to 20 seconds.


Tuesday, April 17, 2012

Easy tomato basil white pizza with fresh mozzarella

This pizza is really easy to make, and quick, too.  I use rapid rise yeast and from starting the recipe to the first bite, it was only one hour.  You can use ready-made dough to save even more time. 
Ingredients:
Pizza dough:
1 pkg yeast
1 tsp salt
1 tbsp sugar
1/4 cup oil
1 cup warm water
3 cups flour

Toppings:
ranch dressing
Sliced tomatoes
fresh mozzarella
fresh basil leaves

Directions:
Combine yeast, salt, sugar, oil and water.  Let stand 5 minutes.  Stir in flour and knead until the dough is soft and elastic.  Cover and let rise about 45 minutes.  While rising, preheat oven to 450.  Roll out dough into a large circle, then cover dough with a drizzle of ranch dressing- I used about 3 or 4 tbsp to cover a large pizza.  Then layer sliced tomatoes.  Cook for 5-10 minutes (until dough looks almost done) then pull out and add sliced fresh mozzarella.  Return to oven until cheese is bubbly.  Immediately after taking the pizza out, sprinkle basil over top.  Enjoy!  Its really yummy and very fast.


Friday, April 13, 2012

White Chip Mocha Cookies

 These are so, SO good. They are the result of experimenting with the right amounts of butter, shortening, and flour, to get the taste and texture I always crave in a cookie.

I am really picky about cookies.  They have to be soft and chewy, with slightly crisp edges.  They have to taste buttery and sweet, but not too much so.  They have to be the perfect thickness- These cookies fit the bill perfectly.  I created this recipe early on in our marriage and they are always gobbled up within a day or two.


Ingredients:
1/4 cup butter- room temperature
1/4 cup shortening
1 egg
1 tsp vanilla
1/2 cup brown sugar
1/4 cup sugar
1 tsp baking soda
1/8 tsp salt
2 tsp instant coffee
1 cup flour
1/4 cup dark or regular cocoa powder
1/4 cup white chocolate chips
1/4 cup chocolate chips

Directions:
  • Preheat oven to 350 degrees.
  • In a large bowl, cream butter, shortening, brown sugar, white sugar, egg, and vanilla.  
  • In another bowl, mix together flour, salt, baking soda, coffee, and cocoa.  
  • Add butter mixture to flour mixture and stir well with a spoon. 
  • Then, stir in white chocolate and chocolate morsels.  
  • Place by rounded tablespoon onto a cookie sheet- makes about 2 dozen.  Bake for 8-11 minutes, or until tops no longer look shiny.  
  • Allow to cool for 2 minutes on cookie sheet before taking cookies off to put onto cooling rack. 


Thursday, April 12, 2012

Oven roasted tomatoes and peppers with rotini and chickpeas

This meal is very satisfying and healthy.  It also makes the kitchen smell great while you are cooking!  It didn't take terribly long to cook, probably around 40 minutes start to finish.  It may become a go-to if we ever need to use up some tomatoes.

Ben and I were given an abundance of tomatoes last summer from my in-laws, and discovered the perfect way to use up large quantities, skin and all- roast them.  They taste like another vegetable (fruit?) altogether after they've been drizzled with oil and sprinkled with salt and roasted to heavenly perfection.  You can plunk them in a blender to create a super delicious tomato soup, full of anti oxidants.  I only had two tomatoes to use up in this instance, though, and was craving pasta.  This recipe was the result.
Ingredients
  • 2 medium tomatoes, skins on
  • 1 small yellow bell pepper
  • 1/2 box of whole wheat rotini pasta
  • 1/2 jar of spaghetti sauce 
  • 1 small can of chickpeas
  • Salt and olive oil
Directions
Preheat oven to 400 degrees.  Quarter the tomatoes and slice bell peppers into similar sized chunks.  Place in roasting pan and drizzle with olive oil, sprinkle with salt.  Place in oven and roast for 20-25 min, until peppers are browning and tomatoes are sizzling.  Meanwhile, begin cooking pasta according to box directions.  In a large sauce pan, warm up spaghetti sauce and chickpeas.  Heat to simmering.  Add pasta, stir.  Place the roasted tomatoes (skins and all!) and peppers into a blender, and pulse until it becomes a thick sauce.  Pour into pan with spaghetti sauce and chickpeas. Optional: If desired, place dice sized chunks of mozzarella or cheddar cheese in pan and allow the heat to soften the cheese before eating.   


Wednesday, April 11, 2012

Tofu- Egg Salad

This is a very fast, easy, basic tofu-egg salad recipe.  Its healthier than the regular stuff but tastes just as good!

Ingredients
2 hard boiled eggs
1/2 block of firm tofu, water pressed out
1 tbsp Nayonaise (or whatever kind of mayo you have)
1 tsp mustard
1 tsp spicy mustard
1/4 tsp minced fresh dill

Directions: Use a fork to mash up egg and tofu into crumbly pieces.  Add other ingredients and mix well.  This tastes great on a salad with fresh cucumber slices, and I'm sure it would be great in a sandwich. 

Tuesday, April 10, 2012

Sweet and Sour Spiced Tofu Stir Fry


Ben and I eat a lot of veggies, and stir-frying is one of our favorite ways to eat them. This stir fry is a nice blend of sweet and sour, and has a smoky taste of cumin.  If you like some heat, you can add some red pepper flakes, but I used a hot pepper jelly that left it mildly spicy.  Its very forgiving and you can really play around with the recipe, substituting whatever veggies you have on hand, and it pairs well with rice and a simple side salad. 
A word on tofu: If you've never cooked with tofu before, I suggest an open mind.  It really isn't that scary.  It doesn't taste like much on its own, and the consistency varies from firm (think hard boiled egg white) to soft (cream cheese texture) depending on what you get.  It absorbs the flavors of whatever it is prepared with or marinated in.  Personally, we've always gotten firm and extra firm tofu, but I wouldn't be opposed to trying soft or silken tofu.  If you aren't used to it,  try it along with another ingredient so it isn't all by itself- such as blending it 50/50 with ricotta in a lasagna.  It really isn't that scary.  A 1/2 cup serving has just 88 calories, 10 grams of protein, and a good amount of iron, magnesium, folate, manganese, and many other minerals.   

Ingredients:
Tofu and marinade:
 1/2 block of firm/extra firm tofu (about 1 cup chopped)
2 tbsp balsamic vinegar
1 tbsp honey
1 tbsp mango hot pepper jelly (if you don't have this, just use apricot jelly, or even extra honey or brown sugar)
2 tbsps soy sauce

Veggies and spices: (substitute others as long as you keep the same amounts)
2 carrots chopped
1 large onion, chopped
1 cup chopped broccoli florets
1 small yellow pepper
1 small orange pepper
1/4 cup corn
1 tbsp cumin seeds

Directions
  1. Start with the rice, and then tofu preparations.  If you are using brown rice to serve with this, start cooking the rice since it will take 40 minutes to fully cook.  Otherwise you can wait a few minutes, then prepare white.  Or if you're really in a hurry, you can use instant rice.  This recipe serves 4 so cook however much rice you think you'll use.  Press tofu to remove excess water (I wrap in a clean towel and place a heavy pan on top for around 30 minutes). Whisk together marinade ingredients in a bowl, add chopped tofu.  Allow to marinade in fridge for 3o minutes or more, while you prepare the rest of the stir fry. 
  2. Assemble and begin chopping the veggies.  While you are doing so, put a tbsp of oil in a cast iron pan and heat to medium.  Add the cumin seeds- the heat of the oil will draw out amazing flavors from the seeds.  It really is a must- powdered cumin doesn't hold a candle to it.  
  3. Once the oil is hot, begin adding your veggies. Add the onions and carrots first, cook for about 10 minutes or until starting to soften, then add the rest of the veggies.  Continue cooking on medium, stirring occasionally and adding more oil if necessary. 
  4. Once veggies are cooked, add the tofu and marinade, stirring well.  Salt if desired-I did not need much salt since the marinade is already salty. 
  5. Serve over rice. 
  6. Enjoy!

Monday, April 9, 2012

Our Guard Dog

Our dog, Hailey, is a great guard dog.

 She is very friendly but also incredibly prone to barking.  Especially around things she thinks are a threat, or should be eaten.  This list includes cats, birds, squirrels, deer, and lately, Amish buggies when we drive through Lancaster.  Shetland sheepdogs were bred to herd, so it makes sense that she would want to chase these kinds of things. More information on shelties here.  With the return of warmer weather, I've started letting her stand out on the balcony from time to time.  She's sure to warn us if she thinks there's something dangerous out there- like a cat or deer.  Or both, as seen in this video:

Sunday, April 8, 2012

Wednesday, April 4, 2012

No-sew fabric flower hairpin

Lately I've decided to experiment with creating flower hair clips. I've always avoided projects like these because I don't enjoy sewing, so once I realized all you need is scissors, old fabric, and hot glue, I was so excited.

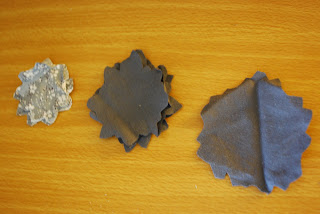
For this project, you will need just a few scraps of cotton cloth. You can have all one color but I chose to do two for this one.
  1. Start with a large piece cut with the edges scalloped, which is on the far right. You can follow a pattern but I don't. It turns out fine if the edges aren't perfect, this is a forgiving design. You'll also need a set of four slightly smaller scalloped circles, and then four more that are slightly smaller yet. You can see I didn't bother ironing the fabric- its okay, it will still turn out fine.
  2. Lay out the largest circle and on top, hot glue on the second largest circles, by folding them into quarters and glueing them evenly spaced around. I tried to show that in the photo, but its tricky to describe. Hopefully you can see what I meant. :)


3. Then repeat the same process with the slightly smaller scalloped circles- I used the patterned fabric on top of the solid grey.
4. All done! You can leave it as-is, or top it with a pretty bead or hot glue a button on. In this case I topped mine with another layer of four (smaller yet) scalloped circles, and then pinned a little white flower that was part of a scrap-booking embellishment. You can then attach it to a bobby pin, or if you have thick hair like me you can glue it to a clip.

Mini apple pies

I have a confession to make. Its one that's saved us a lot of money on produce, and I'm not ashamed to admit it. I buy produce from the crash and dent. From the discount cart. The rejected fruits and veggies with bruises and flaws. The thing I think people don't realize is, sometimes the discount produce is NOT that bad. It sometimes just depends on the store. I've certainly seen some things that should never be labeled for sale- well on their way out and past their prime. But certain veggies are okay, including things like apples, zucchini, or peppers, because you can tell just by looking at them if they are still salvageable. These gala apples were delicious (I ate four last week during my lunches) and they hardly had any dents or bruises. I've bought less-pretty ones before and baked them into a pie or applesauce, but these were good enough to eat fresh. They were packed up for less tan 50 cents a pound. A small side tangent- we discovered on Sundays, a local grocery store marks down organic boxed lettuce mixes like spring mix for example, for half price, because its a day or two before its sell by date. It stays fresh a few days after, so if you eat a lot of greens (we can plow through a huge box in a matter of days) than you'll eat it up before you have to worry about it being "bad." Also, believe it or not, sometimes discount produce isn't really discount, so be careful. I will weigh the package if it doesn't have the weight on it. $1.50 a pound for green peppers is not discount, for example. You should expect to pay half price or LESS for discount produce. I decided to use up the remaining apples in a baked dish- if you don't feel comfortable eating discount produce, try cooking it right away into something. I also had a can of refrigerated biscuits that was soon to expire. This simple recipe is easy and looks really cute. It would work well for a brunch, or even as a snack to take to work. Here's how to make them:

Ingredients:
5 apples, peeled and finely chopped
1 can of refrigerated biscuits (I used pillsbury)
1/2 tsp cinnamon
1/4 cup brown sugar
1 tsp corn starch
3 tbsp butter plus 1 tsp canola oil


Directions: On low heat, melt butter and canola oil in a sauce pan. Add apples, cinnamon, and cornstarch, allowing to cook until softened, about 15 minutes. Meanwhile, preheat oven to 350 degrees and begin placing the biscuits into a muffin tin, pressing up the sides to create a little pie crust. I used flaky layers and actually split each biscuit in half to get a thinner crust. I had a couple of extra pieces leftover at the end and just used those to create a top crust. I ultimately liked the open pies better, though. Make you stir the apple mixture a few times as it cooks. The cornstarch will thicken it. Once they are soft, use a spoon to heap them inside of the biscuits and then place in the oven for about 15-20 minutes, until the crusts are golden and cooked. If I make these again, I might try adding a crumble topping. If you have a big sweet tooth, be aware that 1/4 cup sugar for all those apples is actually not much, and they don't turn out that sweet. If you like really sweet pie, you could probably double the sugar and it would still turn out fine. I'm trying to reduce my sugar intake, and felt like it was just enough sweetness. Another thing I might try is making a savory version of these, using a mixture of apple, potato, onion, and Morningstar sausage, and swiss cheese (its really yummy, I've made it as a pot pie before). If you feel its too much sweet stuff for your family, or don't think you can eat them fast (they are good for a day or two but if you can't eat them up by then they won't stay fresh long) than freeze them. You can thaw them out, microwave or re-toast, and enjoy a warm, fresh, mini apple pie any time.

Tuesday, April 3, 2012

Spring Cleaning

Ben and I took a walk the other day- the weather has been so lovely. The leaves are going to be out soon, and there's some pretty phlox and tulips blooming already. As we walked down the lawn, we were stuck by an awful eye sore- our own balcony. The result of "hurry up and stuff it outside" mentality, its become a pit of items thrust out-of-sight and out-of-mind in the wintertime.
As you can see, once spring rolled around, we tossed a lot of things out there- the right hand pile is actually our Christmas tree packed away, bikes on the left, and wait till you get a hold of our balcony closet...


Its rather embarrassing how horrendous the pile has become. Part of the huge mess is that I needed to dig out our folding table, which was in the BACK of the pile, to take into school one day. I was in a hurry, so I climbed up to the top of the pile (I'm kind of cringing thinking about it) and yanked it up and over the heap, and dragged it out.

It reminds me in a small scale of the show about hoarding. Something had to be done. I've found with a big mess, the best approach is to completely empty out the area you intend to organize, and then go through everything, weed out things to throw or give away, and place things back in a more orderly fashion.


So, for your enjoyment, here's what the balcony looked like AFTER I emptied the whole closet out:


It was rather ridiculous. Two folding chairs, two bike racks, two lawn chairs, one rocking lawn chair, three plant stands, about fifty pots for plants, rags and painting supplies galore, and much more. And one dog, somewhere in the mix. After going through it all, sweeping out the closet, and re-organizing the whole thing I came up with a box of extra things to give away and two garbage bags full of trash (mostly old potting soil from last summer's plants). I also discovered two nails high up in the closet and used those to hang the bike racks and a snow shovel. That freed up some space below, and everything fit much better after I was finished:


Here's the "before" and "after" to save you from scrolling back up.
Its still not that pretty looking
but a definite improvement...